
Subway tiles are one of the most popular tiles in the market. With a vast array of options available, ranging from small to long sizes, straight edges to bevelled finishes, matt to glazed surfaces, and porcelain to natural stone materials, there's a subway tile to match every project. Subway tiles are a timeless style and perfect for homeowners seeking a classic federation or colonial look. Despite their history as a traditional tile, they've come a long way in terms of variety. There almost isn't anything you can't do to make your subway tiles stand out and put your flair on them.
For many homeowners, that classic spotless white subway tile is the perfect look. Thanks to all the amazing colours, textures, and shapes there are to choose from, however, you may be looking to experiment. There are so many ways to lay your subway tiles. We’re giving you the lowdown on the best ways to lay your subway tiles.
Classic Bond Pattern
Bond Pattern Subway Tile is a classic choice for interior design, featuring subway tiles laid in a brick formation. This classic layout evokes a sense of nostalgia and pairs beautifully with geometric shapes, particularly hexagon patterns, as well as vibrant colours and accent walls. With its enduring appeal and versatility, the Bond Pattern Subway Tile remains a popular choice for creating stylish and inviting interiors.
Intalling your subway tiles in a brick formation is the most classic interior design method. Before all of the innovation in laying subway tile took place, this was how it started. Those who want to create a feeling of nostalgia in their home may opt for this timeless design. This style pairs well with:
- Geometric shapes, especially hexagon patterns
- Pops of colour
- A statement wall
How to install Bond Pattern Subway Tile?
- The first step is to clean the surface where you'll be installing the tiles. Make sure it's dry and free from any dirt or debris.
- Measure and mark where the tiles will go. Decide on the starting point and how you want the pattern to look.
- Use a trowel to spread tile adhesive on the surface. Make sure it's even and covers the area where you'll place the tiles.
- Press each tile into the adhesive, starting from the designated starting point. Use spacers to keep the tiles evenly spaced.
- Use a tile cutter to trim any tiles that need to fit around corners or edges.
- Let the adhesive dry completely before moving on to grouting.
- Apply grout between the tiles using a grout float. Make sure to fill in all the gaps and wipe away any excess grout with a damp sponge.
- When the grout is dry, you can clean the tiles and admire your result.
Following these steps will help you install Bond Pattern Subway Tile smoothly and achieve a beautiful result.
90 Degrees Classic

The 90 Degrees Classic Subway Tile presents a natural choice for interior design, characterised by its traditional rectangular shape and clean lines. This versatile tile layout allows for horizontal or vertical installation, offering flexibility in design. With its timeless and understated appearance, the 90 Degrees Classic Subway Tile effortlessly complements a variety of decor styles, making it a popular option for adding elegance to any space.
How to install 90 Degrees Classic Subway Tile?
Installing 90 Degrees Classic Subway Tile is a straightforward process that can be done by following these steps:
- Begin by ensuring that the surface where you'll install the tiles is thoroughly cleaned, dry, and devoid of any debris or dust.
- Take precise measurements and mark the designated area for tile placement. Determine the starting point for your installation process.
- Applying a thin layer of tile adhesive to the surface buy using a trowel, ensuring consistent coverage across the designated sections.
- Place each tile onto the adhesive, applying gentle pressure to secure them firmly in place. Maintain uniform spacing between tiles using tile spacers.
- Use a tile cutter or wet saw to accurately cut tiles as needed to fit around obstacles or along edges, ensuring a seamless appearance.
- Allow the adhesive to dry completely as per the manufacturer's instructions before proceeding with further steps.
- Apply grout to the spaces between the tiles using a grout float, ensuring thorough coverage and smooth application. Wipe away any excess grout with a damp sponge.
- Once the grout has cured, apply a suitable grout sealer to protect it from stains and moisture, enhancing its longevity and durability.
- Complete the installation process by applying caulking around the edges of the tiled area for a polished and professional finish.
Herringbone Pattern

The Herringbone Pattern Subway Tile offers a stylish choice for interior design, with subway tiles arranged in a distinctive zigzag pattern resembling the bones of a herring fish. This classic layout adds visual interest and texture to any space. Versatile and dynamic, the Herringbone Pattern Subway Tile can be used to create focal points, accent walls, or entire backsplashes, enhancing the aesthetic appeal of kitchens, bathrooms, and other areas of the home with its timeless charm.
The classic herringbone pattern is very trendy right now. The tiles are laid diagonally, facing in different directions. This is a stunning design, which is very popular for kitchen tile splashbacks.
How to lay Herringbone Pattern Subway tile?
- The first step in laying a herringbone pattern involves locating the central point of the wall. Measure the wall's length and mark its midpoint.
- Decide the starting point. A floor layout differs from that of a wall. For floors, you commence from the centre and extend towards the adjacent walls on both sides. Conversely, when working on a wall, it's preferable to start from the bottom. This precaution is necessary as gravity may potentially cause tiles to slide downwards, disrupting the pattern. Alternatively, you can opt to utilise a ledger board placed in the middle. A ledger board is essentially a straight board securely affixed to the wall, providing a resting surface for the tiles. Upon completion, the ledger board can be unscrewed and replaced with tiles.
- The initial tile holds significant importance as it establishes the pattern for the subsequent tiles. To ensure the pattern is perfectly symmetrical on both sides, initiate it as depicted in the image below. To achieve a 45-degree angle, employ a combination square (without the ruler) or draw a line using a trim square.
Step Ladder
The Step Ladder Pattern Subway Tile is perfect for creating a sense of height and openness in small spaces. Whether used as a stylish accent wall or a charming backsplash in your kitchen, this pattern adds a subtle yet captivating touch. It effortlessly catches the eye and enhances the overall look of the space.
Step Ladder Subway Tile is a unique and innovative approach to subway tile installation, where the tiles are arranged in a stepped pattern resembling a ladder.
Laying Step Ladder Subway Tile involves taking the classic herringbone pattern and tilting it 90 degrees. Some bathroom tiles will be positioned vertically, while others will lie horizontally. This unique pattern is most effective in tall spaces, such as showers. It's effective at drawing people in and is visually interesting without overwhelming people.
Horizontally Stacked
Horizontal Stacked Subway Tile presents a timeless and sophisticated approach to tile installation, showcasing subway tiles arranged in a sleek horizontal pattern. It can make your kitchen or bathroom look wider. This layout works best in taller yet smaller kitchens or bathrooms, creating a visually open and spacious feel in both width and depth. This classic layout exudes a sense of elegance and simplicity, making it an ideal choice for achieving a modern and refined look in any setting. With its versatile design, Horizontal Stacked Subway Tile is suitable for a wide range of applications, from kitchen backsplashes to bathroom walls. Its understated yet stylish appearance makes it a favoured option for both residential and commercial projects alike.
None of the Horizontal Stacked Subway tiles are offset and it is one of the easiest subway tile treatments to install! This works best in:
- Coastal, 70s, and mid-century style bathrooms
- Transitional and modern designs
- Kitchen backsplashes designed to allow other fixings to stand out
Vertically Stacked
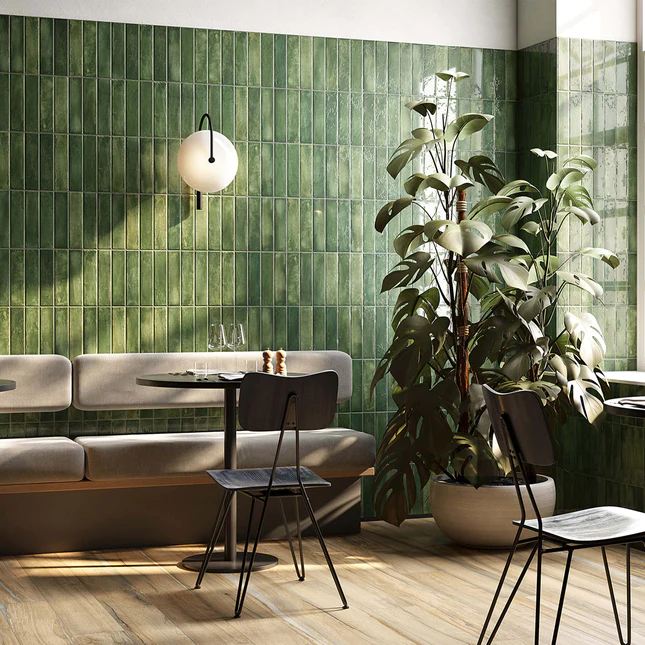
Vertical Stacked Subway Tile introduces a modern approach to traditional subway tile installation. This method involves arranging tiles vertically, layering them one over the other to create a contemporary aesthetic. The vertical orientation adds visual interest and can help elongate walls, making it an excellent choice for accentuating height or creating focal points.
Whether used in kitchens, bathrooms, or other areas of the home, Vertically Stacked Subway Tile adds a contemporary touch while maintaining the timeless charm of subway tile. Its sleek and streamlined appearance enhances the overall aesthetic of any space, making it a popular choice among homeowners and designers alike.
Vertical Stacked Subway Tile is a vertical counterpart to the horizontal stacked bond design. Tiles are stacked right on top of each other in straight lines. These fill wall space between countertops and expansive kitchen windows beautifully.
In Conclusion
Subway tiles remain an Australian favourite, being that they're stylish and not too complicated to install. Whether you lean towards tiles that are off-set, stacked, or bond style, there’s a lot of room for creativity. How you lay your subway tiles can give the room so much more added personality. Furthermore, if you'd like to preview different design styles, you can try our free TMhouse visual design tool. Simply drag and drop with your mouse to see the desired design effects. We also put out helpful articles, tips and guides to help your bathroom, kitchen, living room and bedroom design. Remember to check out our tile and bathroom blog!
Let us know which of these subway tile styles you love the most and the Tilemall team will send up to 5 cut samples to your home at no cost - all we ask is that you cover a modest $15 shipping fee.
